NOTE: This is a deprecated guide since the introduction of the font uploader with Semplice 5. Please refer to this guide only if you do not have the font uploader, or prefer to upload fonts manually.
NOTE: This is a deprecated guide since the introduction of the font uploader with Semplice 5. Please refer to this guide only if you do not have the font uploader, or prefer to upload fonts manually.
The Complete Self-Hosted Font Guide
The Complete Self-Hosted Font Guide
To get started, you can follow either along in the video below or read further down the page for the complete guide.
To get started on installing your custom fonts, we recommend installing a plugin called WP Extra File Types so you can easily upload and get file paths for custom fonts in Wordpress.
To install, go to Plugins > Add New and search for "WP Extra File Types" and install and activate the plugin. You can now upload font files right in Wordpress!
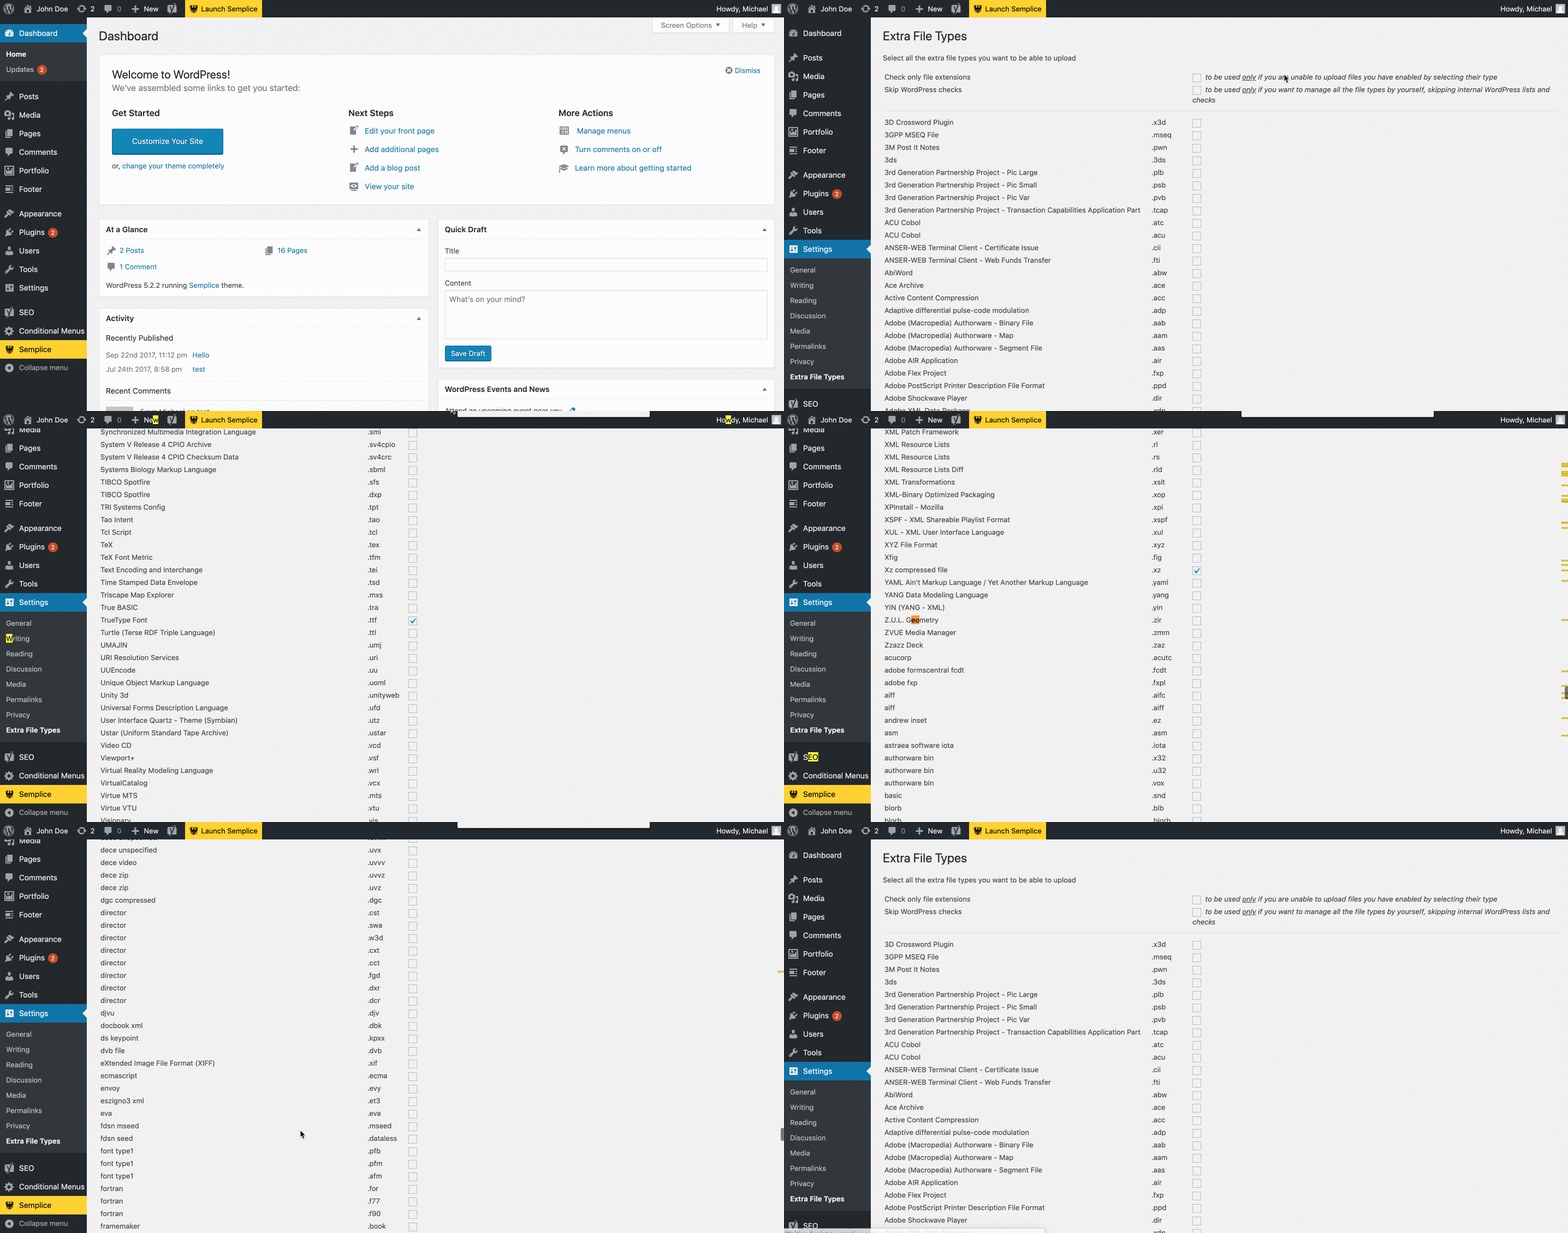
Note: You will need to enable all the filetypes you want to upload by going Settings > Extra File Types and enabling .eot, .woff, .woff2, .svg and .tff (use the search feature in your browser to find each filetype).
1. Install plugin
To get started on installing your custom fonts, we recommend installing a plugin called WP Extra File Types so you can easily upload and get file paths for custom fonts in Wordpress.
To install, go to Plugins > Add New and search for "WP Extra File Types" and install and activate the plugin. You can now upload font files right in Wordpress!
Note: You will need to enable all the filetypes you want to upload by going Settings > Extra File Types and enabling .eot, .woff, .woff2, .svg and .tff (use the search feature in your browser to find each filetype).

You will need to enable all the filetypes you want to upload by going Settings > Extra File Types and enabling .eot, .woff, .woff2, .svg and .ttf (use the search feature in your browser to quickly find each filetype).
To get started on installing your custom fonts, we recommend installing a plugin called WP Extra File Types so you can easily upload and get file paths for custom fonts in Wordpress.
To install, go to Plugins > Add New and search for "WP Extra File Types" and install and activate the plugin. You can now upload font files right in Wordpress!
Note: You will need to enable all the filetypes you want to upload by going Settings > Extra File Types and enabling .eot, .woff, .woff2, .svg and .tff (use the search feature in your browser to find each filetype).
2. Upload your fonts
2. Upload your fonts
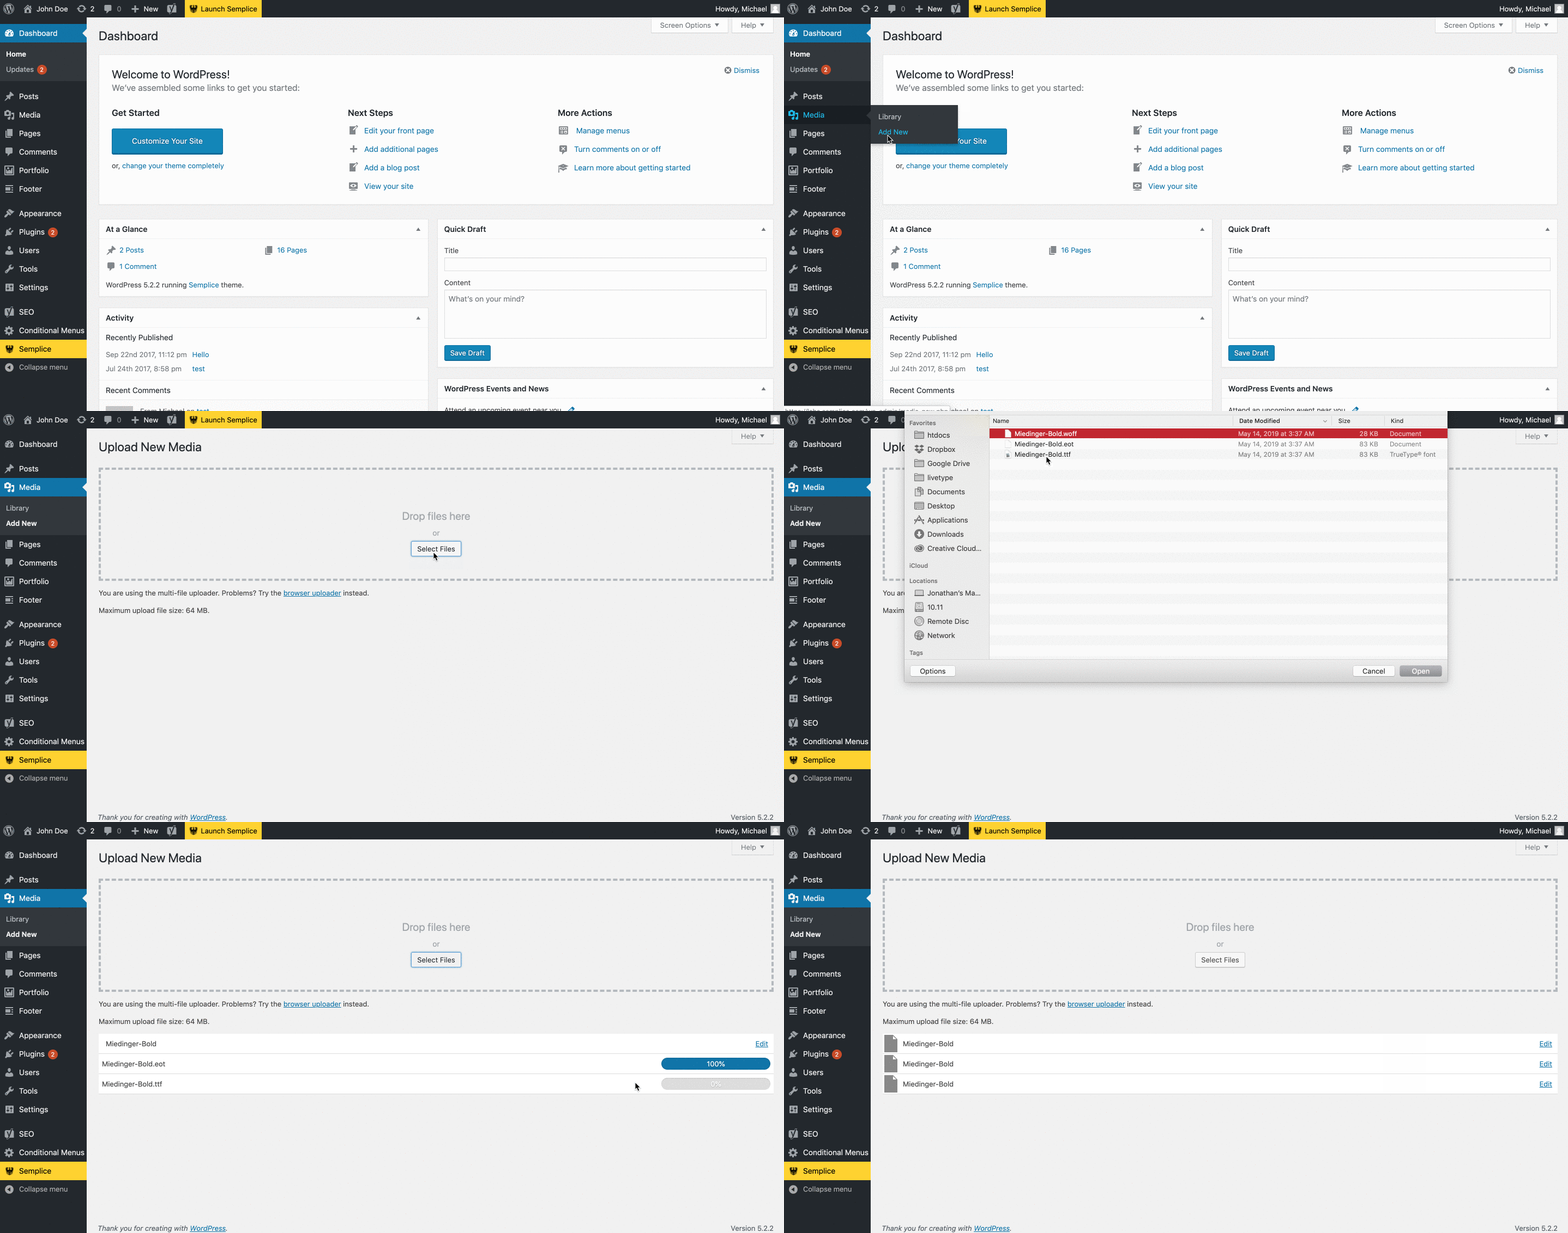
To upload a font, go to Media > Add New in the Wordpress dashboard and select your fonts to upload.
Protip: In order for your font to load on most browsers, we recommend installing three or more file formats for a single webfont. Your font vendor can provide these for you, or you can use a service like this one to get additional file formats for your LICENSED webfont.
3. Retrieve font paths
3. Retrieve font paths
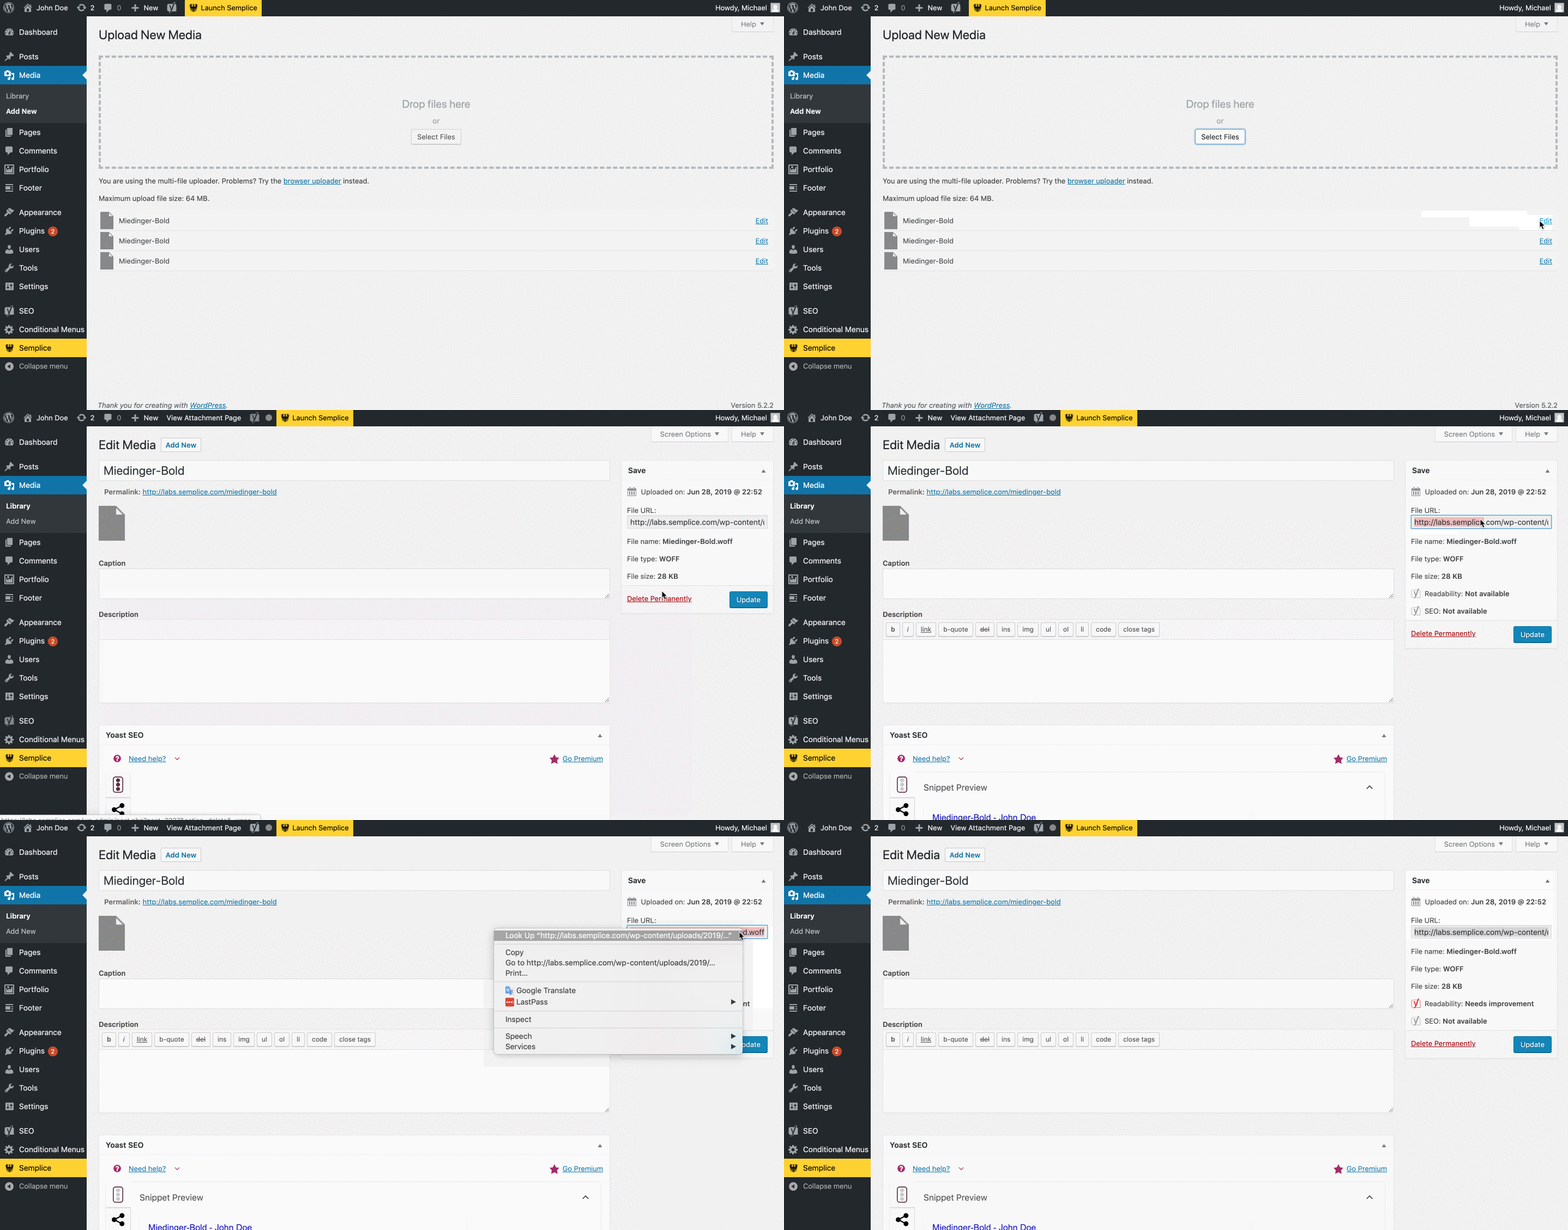
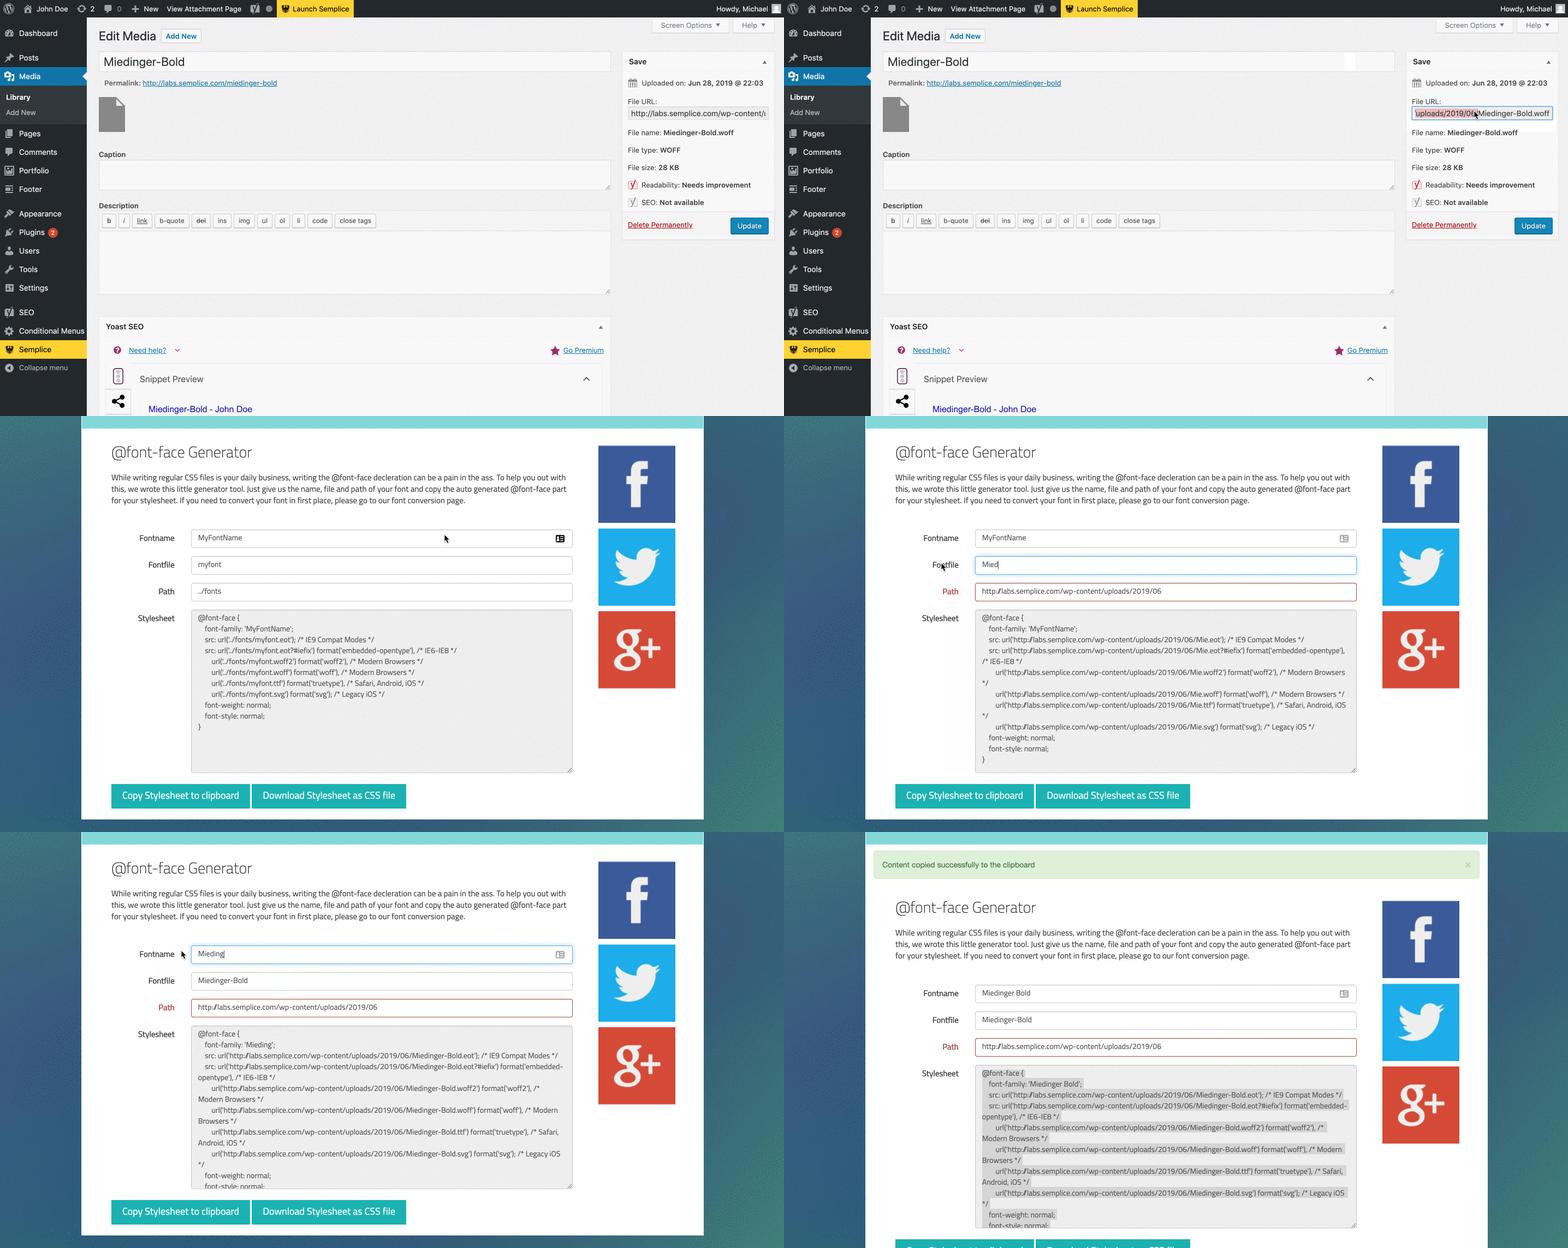
Once your font file is uploaded, you can click Edit and retrieve the font path URL directly in Wordpress.
Note: If you delete these files, your fonts will stop working.
Once your font file is uploaded, you can click Edit and retrieve the font path URL directly in Wordpress.
Note: if you delete these files, your fonts will stop working.
4. Install your fonts
4. Install your fonts
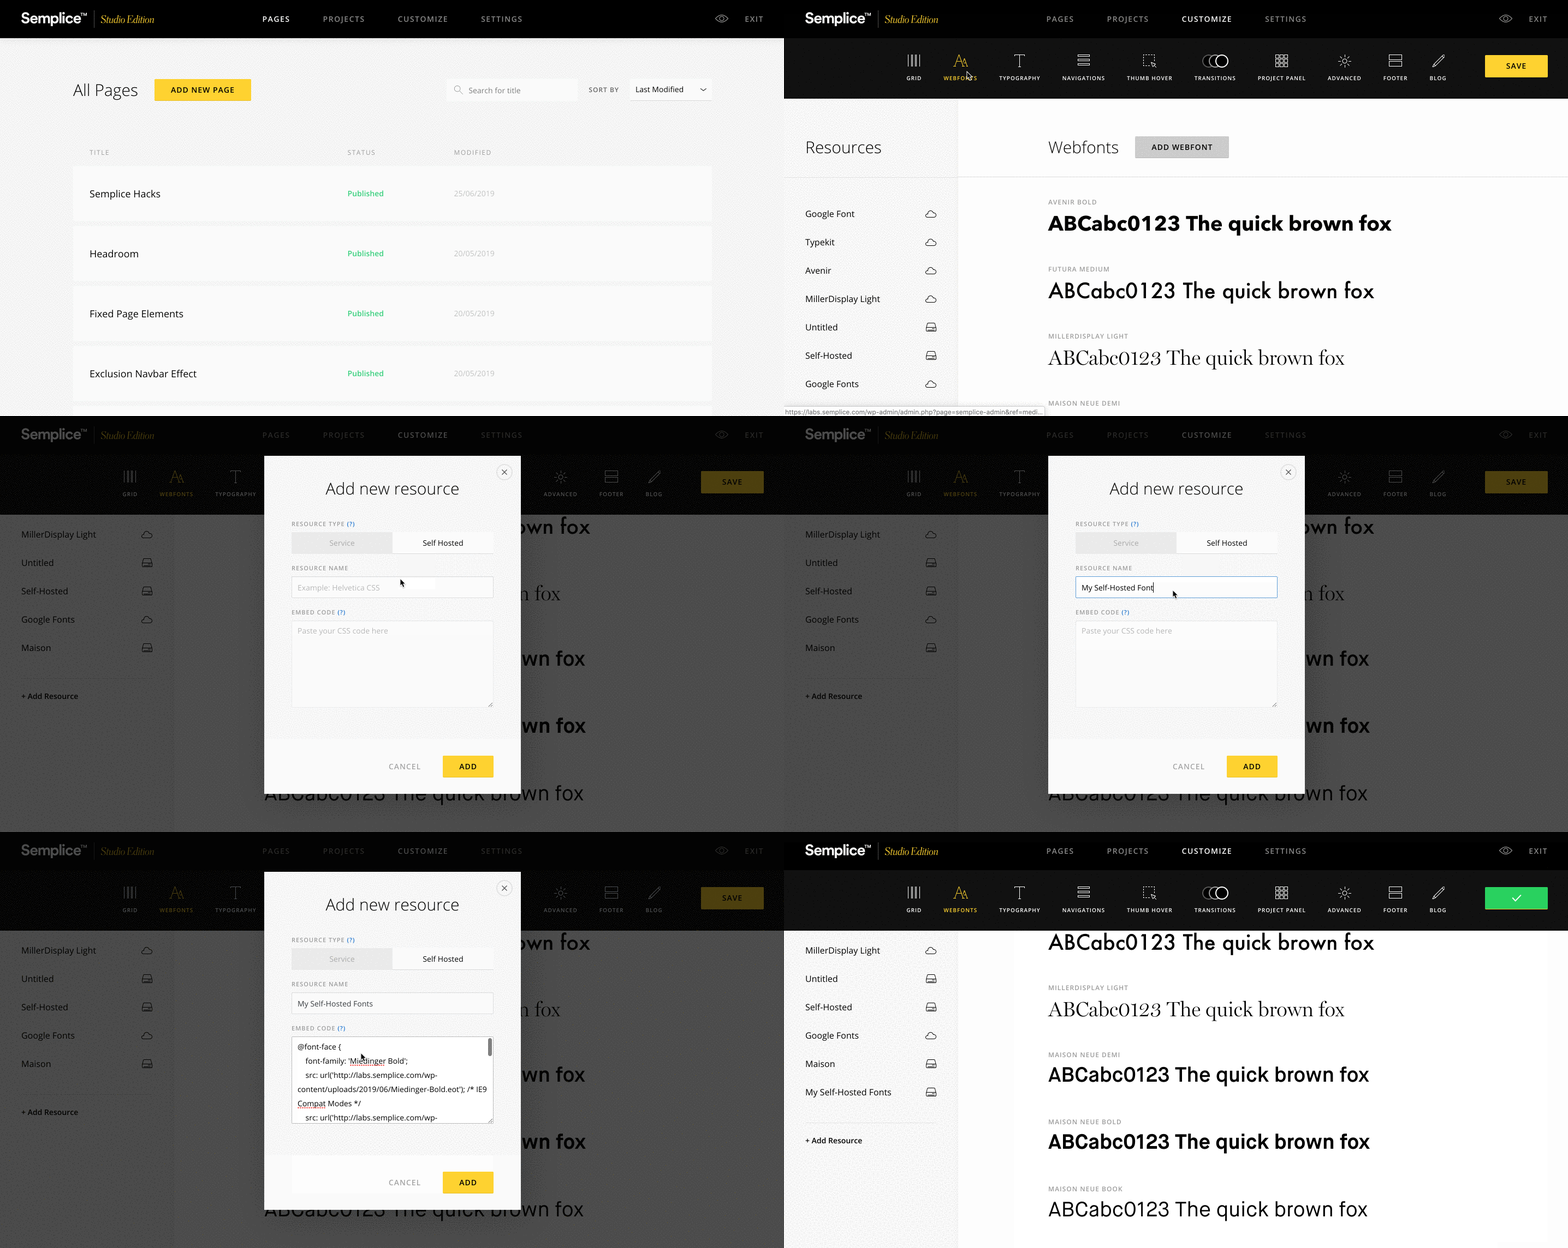
With your font URL paths on hand, you can now navigate to Semplice > Customize > Webfonts to install your custom web font. Click 'Add Resource' and set the Resource type to 'Self-Hosted'
Paste in the CSS code required to load your font (you should receive this from your vendor), replacing the font path URLs and System Name with your own font path URLs.
Important: ensure the font resource type is set to "Self-Hosted" and not "Service", otherwise the font will not load.
3. With your font URL paths on hand, you can now navigate to Semplice > Customize > Webfonts to install your custom web font. Click 'Add Resource' and set the Resource type to 'Self-Hosted'
Copy this CSS code, replacing the font path URLs with your own:
If your font vendor did not provide CSS for your font, you can use this tool to generate the CSS for you.
3. With your font URL paths on hand, you can now navigate to Semplice > Customize > Webfonts to install your custom web font. Click 'Add Resource' and set the Resource type to 'Self-Hosted'
Copy this CSS code, replacing the font path URLs with your own:
Important: when using this tool, be sure to set 'Path' to the file directory folder where your custom fonts are uploaded on your server. Make sure 'Fontfile' is the actual filename of your font.
3. With your font URL paths on hand, you can now navigate to Semplice > Customize > Webfonts to install your custom web font. Click 'Add Resource' and set the Resource type to 'Self-Hosted'
Copy this CSS code, replacing the font path URLs with your own:
5. Add fonts to your tray
5. Add fonts to your tray
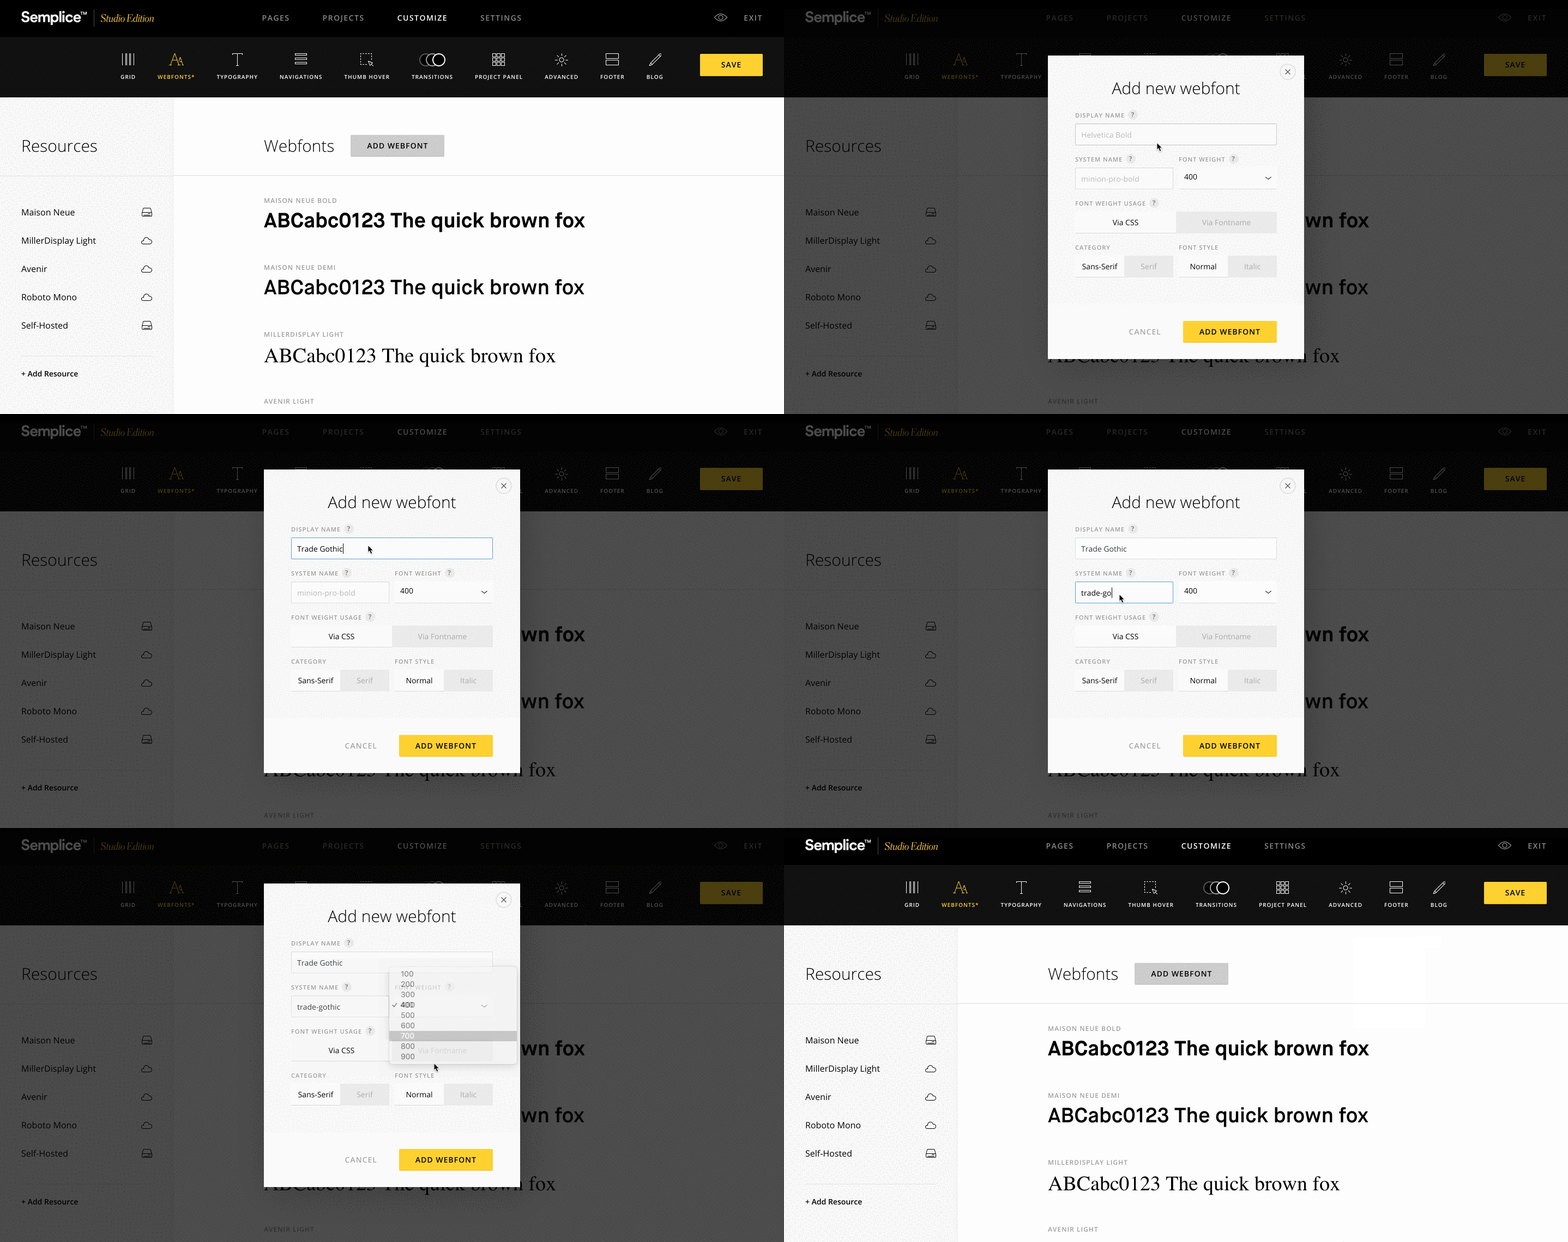
With your Self-Hosted font resource added, next click 'Add Webfont'.
Add in your webfont with the corresponding system name and font weight. You will need to add a separate webfont for every font weight you intend on using.
Important: make sure the System Name matches EXACTLY what you specified in your CSS code under the 'font-family' property. In the example below, 'Miedinger (Bold)' is the internal display name and ('Miedinger Bold') is the system name.
And you're DONE!
You can go ahead and celebrate now.
If you need to upload additional font weights, you will need to repeat these steps and for each individual font weight.
And you're DONE!
You can go ahead and celebrate now.
If you need to upload additional font weights, you will need to repeat these steps and for each individual font weight.
Troubleshooting Tips & Checklist:
Font not loading? Here are some steps you can take to double check that your self-hosted fonts are installed correctly.
- Make sure your system names match
A common mistake is to use a different system than what is listed in your CSS.
Make sure the "font-family" system name listed for your font in the CSS is the EXACT same system name being used in the Webfont settings (this is case sensitive!)
For example, if in your CSS code you have 'font-family: 'Maison Neue Book' than under your webfont's system name would need to be 'Maison Neue Book'.
If you are using several font weights, you will need to add each weight as a separate webfont with its own system name. - Check your URL prefixes
Try with and without the 'www' in the URL prefix.
If SSL security is installed, be sure your URL path includes the "https://" prefix and not just the "http://" prefix.
For example, if your website domain is 'https://yoursite.com', then your font URL path should read as "https://yoursite.com/wp-content/..." - Make sure the resource type is set to self-hosted
When pasting in your CSS code in the Web Resource area, you must paste into the 'Self-Hosted' font resource area. Double-check your font URL paths
Be sure your fonts are actually located at the URL paths you have set in the CSS code. A good way to test this is to paste the font URL path into your browser. If you get a 404 error page, the font is not actually located at that path. We recommend grabbing the exact URL paths inside of the Wordpress Media library if you are uploading fonts through Wordpress to avoid a missing filepath.
Lastly, if you used FTP to upload your fonts, be sure permissions are set correctly on the font files.- Only use webfonts that are properly encoded
Webfont filetypes are either .eot, .woff, .woff2, .ttf or .svg. We recommend installing as many font file formats as possible to ensure your font loads on all browsers.
If you do not have these filetypes, try contacting the font vendor you purchased the font from to get a web ready format. You can also use a service like Transfonter to convert your LICENSED fonts to a web-ready format.
In some cases, your font may not be properly encoded for web and therefore will not load. If this is the case, you may need to contact the font vendor to get a webfont version of your font. - Check for any CSS code syntax issues
Even the smallest typo such as using an incorrect apostrophe can render the CSS invalid. We recommend using the CSS generator in Step 4 to ensure your CSS has no syntax issues.
You can also use a tool like this to check your syntax.

